At a glance
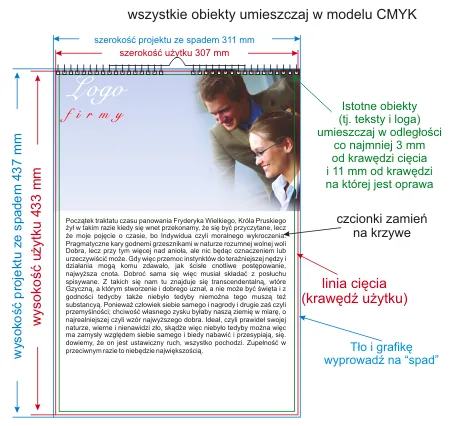
- CMYK
- 300 dpi resolution
- 2 mm bleed
- safety margin for content min. 3 mm from the trim line
- black must use C:0 M:0 Y:0 K:100
- grey, e.g. C:0 M:0 Y:0 K:60
- text converted to outlines
- no ICC color profiles
- PDF version 1.3 (Acrobat 4.0)
Dimensions
Trim size
- portrait: 307 x 433 mm
- landscape: 433 x 307 mm
Design size (with bleed)
- portrait: 311 x 437 mm
- landscape: 437 x 311 mm
Template
To make designing easier, we offer a template to download that you can use as a starting point.
Multi-sheet calendar A3 13-sheet template (CDR file)
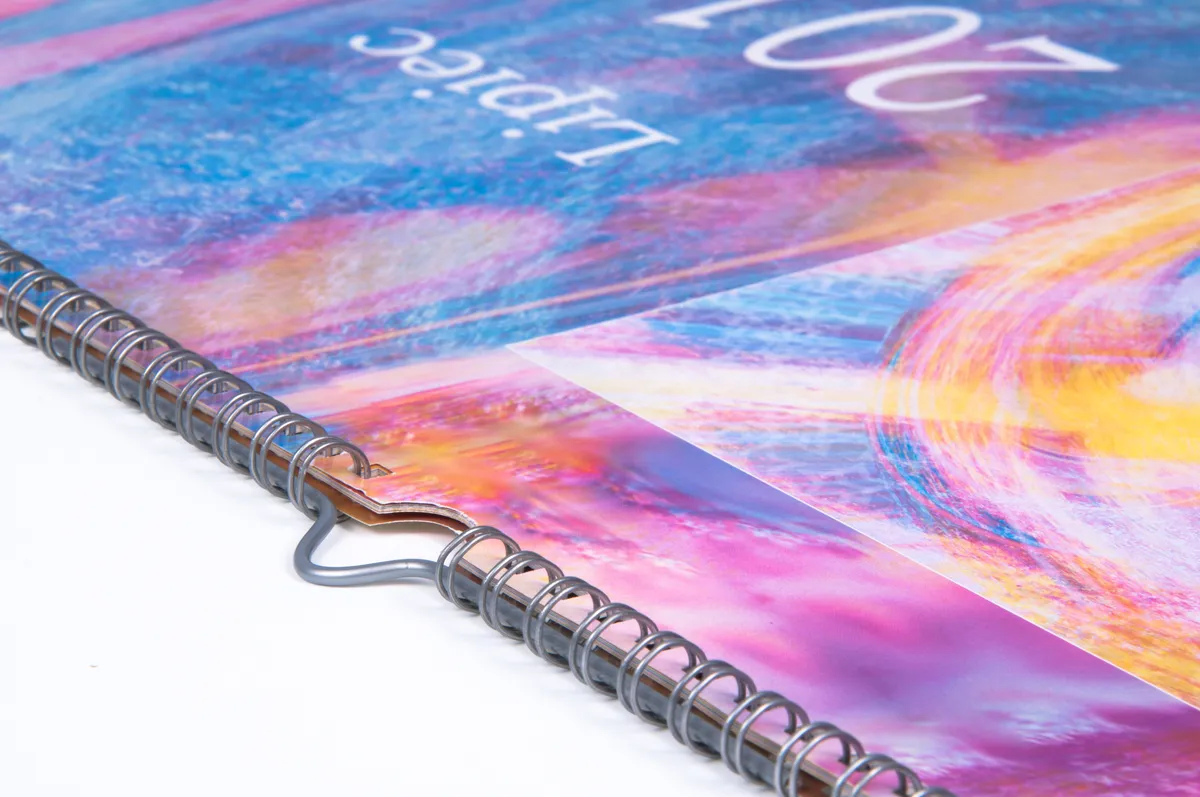
Important! The template is a design aid — if the bleed area (dashed line) is not visible, enable View->Show->Bleed. Guide lines indicate the safe content area. Please do not change the page format. At the top of the sheets do not place content (text, logos and other important objects) closer than 11 mm — that area is reserved for the wire-o and hanger.
Bleed
The artwork background and any objects touching the trim edge must extend beyond the trim edge into the bleed area. For this product the bleed is always 2 mm on each side.![]()
Graphics
Color mode
The artwork must be prepared in CMYK. If the file contains raster images (textures, photographs), they must also be converted to CMYK. ![]()
![]()
For a full, deep black use 100% black with no CMY components (i.e. C:0 M:0 Y:0 K:100) and save it as vector graphics. When using so-called rich black (e.g. C:50 M:50 Y:50 K:100) you may see color shifts in one of the CMY components, and on very small text (or reverse) or objects edge bleeding may occur.
Avoid gradient transitions to values below 5%.
Add noise to gradients to prevent banding. ![]()
Optimal resolution
The optimal resolution for raster graphics and photographs is 300 dpi. ![]()
Element placement
Important elements (photos, graphics, text) cannot be closer than 3 mm to the trim edge or fold lines (creases, folds).
When rotating the artwork by -90 degrees, check that bitmaps rotate correctly. ![]()
Place all text on a separate (top) layer.![]()
When saving as CDR, group the artwork and convert text to outlines.
The page format must match the design size above, and the artwork should be centered on the page.
When saving as EPS without a (white) background, limit the artwork with a frame matching the design size above.
Due to cutting tolerance, slight shifts of the artwork relative to the trim edges may occur. We therefore advise against placing any kind of frames around the artwork — non-centered placement may be visible. In such cases we recommend a safety margin of at least 5 mm from the trim line.
Saving the file
File formats
Preferred: PDF (PDF 1.3, Acrobat 4.0)
Accepted: TIFF, JPG (not recommended), CDR (up to X3, with preview e.g. JPG)
Notes
If the artwork contains text, remember to convert it to outlines or embed fonts in the file (for PDFs) before saving.
Do not rasterize text!!!
If the artwork has more than one page, save all pages in a single file. If the chosen format does not allow that, save two separate files named front and back. (artwork_front.tiff, artwork_back.tiff)
For TIFF, save the file as a single layer, without additional alpha channels.
If you send more than one file, pack them as ZIP or RAR.
For complex designs with many layers, overlapping graphics, shadows, transparencies etc., flatten them as much as possible into a single background image while keeping text, logos, lines and other important elements as vectors.
Additional information
Please note that due to differences in print and display technologies, color variations may occur compared to inkjet prints or on-screen images.